
Tutorial: Female Pennywise (1990/Tim Curry)
Welcome to my really pointless tutorial about how to make yourself a female Pennywise costume out of a plus-size men’s Pennywise costume. This is a tutorial for extreme beginners, by an extreme beginner.
Backstory
As you may or may not have read in the last entry, we decided at the very last minute (THE VERY. LAST. MINUTE.) to be Two Tim Currys for Saratoga Comic Con. I was supposed to be Tim Curry’s Pennywise from the 1990 movie IT. I’m obsessed with Stephen King, and IT specifically, so I was pumped. But the thing is, if it isn’t sexy or cutesy, I’m not wearing it. That’s just me as a cosplayer (unlike Colleen) and as a human being. So I had some designing and interpreting to do.
Like I mentioned, it was THE VERY LAST MINUTE. I had never touched a sewing machine before. At first I wasn’t sure that I could even learn to sew in the time allotted. So I called on the internet for help. I found some amazing inspiration, though– thanks to all you brilliant female Pennywises who came before me! I found a pic (that I cannot find for the life of me now) of a girl who was wearing what looked exactly like the regular store-bought costume with the legs sewn together to make a straight skirt. (Mad props to this girl, because I later realized the whole thing was hand sewn.) This looked like something I could manage, even if my sewing wasn’t brilliant. I started looking for an affordable Tim Curry-style Pennywise costume that I could alter. This was none too easy in October 2017, just a few weeks after the release of the new IT Part I, when the market was saturated with 2017 Pennywises. It was further complicated by the fact that (1) it was the day before Halloween so stock was low (2) I couldn’t have it shipped in time to alter it unless I got it on Amazon and (3) my bank account was crying in protest.
To make a long story short (too late) the only thing I could afford and get in time was a plus-size men’s costume that I could pick up in-store at my local Party City. The really amazing thing: I waited a day until Nov 1 (a/k/a Cosplay Black Friday) to buy it, when ALL COSTUMES ARE 50% OFF IN STORES. If you guys have not been shopping at Party City and Spirit Halloween at 8am on Nov 1, you’re missing the most incredible deals. This year I took an hour off work in the morning to hit the sales. I had to make the hour up later in the week, but it was so worth it.
Supplies
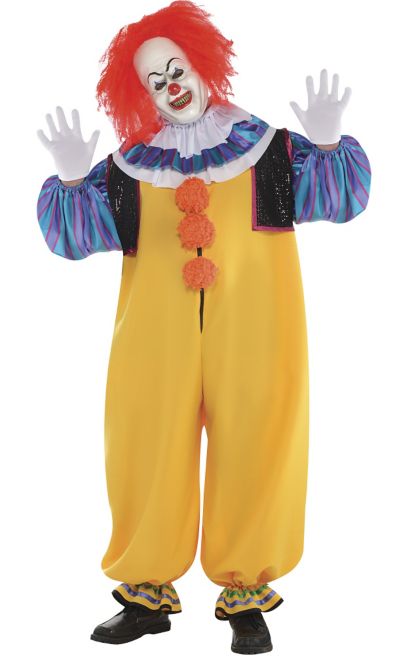
Anyway! Men’s Plus Size Pennywise costume: $27.50. 2 fluffy petticoats: $14/ea. (This reflects in-store November 1st pricing at Party City and Spirit Halloween.)
Here’s what it looks like:
Let’s do this!
Making the Costume
Note 1: I totally did NOT take pictures of each step of this; just a few before and afters. I’ll do my best to show you whatever I can now that the costume is finished. I swear I’m going to come back to this post to add more pictures… I totally swear. *crosses fingers behind back*
Note 2: I would not recommend making any cuts or changes to the costume until you’ve planned out how you’re going to make most of your Pennywise, and you see how it fits on your body. I’m 5’2″ and about a size 10-12… my best guess is that if you’re over 5’7″ you might have trouble with the skirt length, but otherwise I bet this will work for girls up to about a size 14? I’m not sure though. And on the other end– if you’re a very small size (2, 4) you might be better off trying to make this out of the regular men’s size Pennywise costume.
Step 1: Put on the costume as-is.
…and laugh at yourself because you have no idea what you’re doing.
No, but seriously, note where things fall on your body. Where is your waistline? That’s probably where you want the skirt to start. (Is it? Do you want it lower or higher? do you have enough fabric for that?) You’ll want to note your waistline, because you need to keep enough shirt on top to tuck into the skirt at the end, and maybe even blouse over a little. Maybe make a subtle mark on the costume where you want the skirt to start, and leave yourself enough shirt later to go past this point.
Put both legs in one pant leg to see if you like it as a straight skirt with those ankle ruffles as a hem. (You don’t have to do this; I did it for you.) Yikes.
Pictured: The actual minute that I realized I wanted to make a circle skirt, not a straight skirt. Good thing I had just bought two petticoats.
Step 2: Lay the costume out
…on your queen-size bed and notice how it takes up the entire thing. Spend some time contemplating the life choices that have gotten you to this point. (You don’t have to do this; I did it for you.)
Step 3: Get yourself a seam ripper and get to work.
I started with the big black zipper line down the front. Even though the original movie costume does have a visible black zipper, it’s less noticeable/intrusive. I just plain didn’t like it.
But the real reason to take out that zipper is that you’re going to be taking the costume in from this center line.
This costume is made like a lot of store-bought costumes: with a crappy layer of cheap fabric along the back to reduce production costs. It has a seam from the cheap black fabric to the yellow fabric right in the middle of the back.
This means there’s no good place to take it in at the back. As a beginner, you don’t want to deal with that fabric if you can avoid it. The seams along the side are also super complicated because they’re where the seams for the black fabric, yellow fabric, the sequin jacket, and the sleeves all meet.
Pictured: Sleeve seam to front jacket, black fabric, and yellow fabric.
If you’re a beginner, like me, you might not want to mess with that. The center line is one layer of fabric, so it’s much easier to take in from there.
Note: I’m short, but I’m probably a size 10-12 and my bra size is 36D. I took it in maybe 6 inches (not an exact measurement) at the center line, and it didn’t look funny with more fabric in the back. If you’re more like a size 4-6, I can’t promise that you wont have to take it in from the sides at those crazy seams as well. I don’t know how to do that. I just made this up as I went along. Best of luck to you smaller girls!
Anyway. Seam ripper. Rip out that black zipper. Take out the velcro that holds on the big orange pom poms, and the pom poms themselves. Set these aside for later. The velcro too. Waste not, want not.
Then rip out the inseam around the crotch area. It might be a good idea to leave the rest of the inseams and outer seams intact for now.
Pictured: I seam-rip while Colleen makes those EPIC Rocky Horror heels with buckets and buckets of glue and glitter.
Step 4: Make a pattern for your circle skirt.
It’s always a nice idea to pattern and plan ahead before you cut anything. (Some people have to learn that the hard way. You don’t have to do that, I did it for you.)
First, get your measurements. Measure around your waist at the place you want the skirt to sit. Then, put on your fluffiest petticoat(s). You might want to measure your waist with the petticoat ON — since you’ll be wearing the petticoat with your skirt, your waistline might get a little … squished… due to the elastic at the top of your petticoat. OR if your petticoat has a zipper or other bulky closure you’ll want to measure around that. Use your discretion. Next, measure from your waist to the place you want your skirt to fall (on top of the petticoats). Decide whether you want the petticoats to show underneath, or if you want the fabric to hide most of the petticoats.
Depending on the size of the skirt, you can tape newspaper or notebook paper together to make the right size. I used some really old wrapping paper.
I used this fabulous tutorial from MadeEveryday to make the pattern for my skirt… but I ended up doing everything wrong. It’s still a good tutorial.
There are two main differences between her tutorial and what you’re going to do:
(1) She’s cutting her whole skirt out of one folded piece of cloth. You do not have one folded piece of cloth. You have four individual panels that need to get sewn together.
There are a few important things about that.
(A) Seam Visibility: If you sew the four panels together, you’re going to have four seams. That means if your velcro closure is directly in the back, you’re going to have a seam directly in the front. That might not bother you, because your shirt will also have a seam directly down the front. Alternatively you can put the seams on the sides, but your closure will be at your back left, or your back right. This also might not bother you.
If it DOES bother you, you need to make the skirt out of THREE panels, so that you have one panel straight across the front, with seams at the sides and directly down the back. This is what I did… completely by accident, so I can’t tell you how to make the pattern into thirds. I know, this is such a helpful tutorial.
I spent 2 hours online trying to figure out the answer to that, which was hard given that I no longer truly understand 5th grade geometry. I can’t find anyone who describes how to sew a circle skirt out of three equal panels. (If someone out there understands math or finds a tutorial that I missed, please comment.) My best guess: Measure out your quarter piece like a regular pattern. See if you can fit two of the quarters along one leg side by side like this:
In any other circumstance this would not be an issue, but we’re trying to fit the pattern on a leg of this costume. Depending on your size and how long you want the skirt to be, it may or may not fit on one leg panel. We’ll talk more about the quirks of cutting out the pattern from legs in the next step.
Here’s what happened to me — minor instructional lesson about sewing a circle skirt out of panels in bold, so you can skim it:
In my panic to make the skirt big enough, I added a lot to my measurements everywhere because I thought “I can always cut it down!” That’s wrong. If the skirt is one piece of fabric, you can always cut it down. But say, for example, the skirt is four panels and you find that it’s 5 inches too big. You have to take the extra 5 inches out in equal lengths at every seam OR cut the 5 inches out of one panel and you’ll end up with one panel randomly smaller, and your seams will not be equally placed throughout the skirt. I accidentally made the skirt SO big and simultaneously lost some weight and 3 inches off my waist so it ended up where I could remove an entire panel and the remaining 3 panels fit perfectly. *cosplay magic* …sorry.
(B) Seam Allowance: Since you’re sewing each panel together, you need to account for seam allowance between each panel. (unlike the tutorial where she’s only making ONE seam in the whole skirt, you’ll be making either 3 or 4. Seam allowance is often 3/8″ or 5/8″.
4 panels, at 3/8″ = at least 1.5″ for seam allowance
4 panels at 5/8″ = at least 2.5″ for seam allowance
3 panels at 3/8″ = at least 1 1/8″ for seam allowance …just round up to 1 1/4″
3 panels at 5/8″ = at least 2″ for seam allowance
(2) She’s attaching elastic at the waistline. If you feel comfortable doing that, more power to you. I didn’t.
In the end I decided I would leave an opening in the waistline at the back of the skirt and use the velcro from the pom poms to close it. I just hemmed the top the same way I hemmed the bottom. If you know how to add a zipper, you can do that instead of the velcro. It’s probably a lot more secure, but I had no problems with the velcro.
This is all relevant for sizing purposes — if you plan to do a zipper or velcro closure, you probably don’t need to give yourself the extra two inches at the waistline. If you want to add an elastic top, you’ll need to add two inches or more to the waistline, in addition to the seam allowances between the panels we discussed in (1)(B) above.
You ALSO need to remember to leave hem allowance at the top and bottom of the skirt. I did NOT do this. That was unfortunate.
Step 5: Plan out your pattern placing on the costume.
The reason we’re planning before we cut is because you’re going to try to balance the room you need for the shirt with the room you need for the skirt. In general, you should be able to arrange your circle skirt pattern on the legs of the costume, keeping your skirt pattern below the crotch line. If you have to borrow some room from the top half of the costume, be sure to take into account that you’ll need enough shirt to tuck in to your skirt at the end! Even though I have a somewhat short torso, I needed a good amount of the top half to tuck in.
I would be very careful if you’re using a pencil to mark out pattern sections; even a dressmakers pencil. The pencil marks aren’t hard to get out, but using water on this fabric leaves a water stain. You don’t have to do that; I did it for you.
Step 6: Cut the costume in half.
Probably right at the crotch, right where the fabric splits. But if you’ve planned something different in Step 5, be mindful of where you’re cutting!
At this step, I cut off the ruffles at the ankles to make the “pants” easier to work with. I tried to leave 2 inches or so of fabric between the last elastic and my cut, because maybe those can be used for something later? #hoarder
Now you essentially have a shirt, and a pair of pants.
Step 7: More seam ripping and cutting out the skirt panels
Rip out the seam between the legs, so they’re separate.
We’ve kept the seams on the legs more or less intact thus far, to make it easier to cut 2 panels at once. Pin your pattern to both layers of one leg, and cut (or trace and then cut). This is where a rotary fabric cutter can be really clutch, but fabric scissors or a sharp pair of regular scissors would work just fine. I got mine at JoANN Fabric with a 50% off coupon, which are easy to get throughout the year.
If you’re doing 4 panels, repeat with the other leg. If you’re making the double panel we discussed above, and you’ve planned out how it will fit on one side of one leg, it’ll be easier to rip out the seams on both sides of the second leg. Then you can fold the fabric on the dotted line in the picture above, pin your pattern to both layers, and cut (or trace and then cut).
In this step, you can be less worried about using a pencil, because any markings you make will be hidden in the seam allowance.
Step 8: Sew the skirt panels together. Hem the bottom (and top).
After you sew the panels together, iron the seams flat. This will make it easier to sew your hems.
The tutorial mentions serging (which needs a special machine) or overcasting (which I cannot seem to get the hang of yet) your edges before you hem them. That would be a good idea. If you can overcast your edges, this fabric will thank you. It’s miserable and loves to fray. It would be a much biggerproblem if this weren’t just a costume.
I didn’t give myself enough seam allowance on the top and bottom for hems, so my hems are alllllll over the place and just barely hold together. You’ve done better because I warned you about that back in Step 4.
If you’re adding elastic at the top, don’t hem the top. Do whatever the tutorial tells you. She knows best.
Step 9: Closing the circle skirt.
This is where you do whatever you’re doing for the closure. If you’re using elastic, you just keep following that tutorial and ignore me. If you’re using a zipper, kudos and godspeed. If you’re using velcro, read on.
I sewed most of the skirt closed, stopping a few inches from the top. I hemmed the few inches I left open, so they would meet evenly. Then I took a set of velcro pieces from the pom poms that we set aside earlier, and stuck them together. I positioned them over the closure and sewed them on. Messily.
You’re done! …with the skirt. You’re like halfway done.
Step 10: Take in the shirt at the center line.
Put on the “shirt.” Mess around with the center seam until you find a size that’s good for you. Seriously. Pinch the shirt together outward, taking equal amounts of fabric from each side. Pin the fabric on the outside at a size that seems about right (leave space to get your head out!). Then take off the shirt, and do some actual measuring from the ends. To give my shirt a blousy look, I did NOT take it in differently at the bust and waist. My pins were about 3 inches (or something, yours will be different anyway) in from the raw edges of the fabric. I measured a straight line that ran from the neckline to the bottom edge at 3 inches in from the center raw edge. Then I sewed the ends in along that line.
I left myself as much room as I needed at the neckline to get my head in and out. Since you’ll be putting that big neck ruffle over the entire neck and chest area, you don’t have to even worry about a closure at the neck. I just hemmed in the sides at the open neck area so that it woudn’t fray. If you want to put in a snap, that would work well.
Trim off the excess fabric on the inside, then iron the seam flat.
Hem the bottom of the shirt.
Shirt’s basically done! Wahoo!
Step 11: Adjust the neck ruffle.
First, put on the shirt. Then put on your skirt. Tuck the shirt into the skirt. Then put on the petticoats. Adjust the shirt to the desired level of “blousiness.” Wow! You look great!!
Now put on the neck ruffle. If you like the way it fits, move on to Step 12. If it needs to be smaller, this is a great place for another one of those velcro sets we saved from the pom poms. I attached my velcro with hot glue on both sides, because the neck ruffle is so thick, AND the velcro is so thick that I had no idea how to sew through it correctly. The hot glue worked like a charm and I had no problems.
I didn’t worry about trimming off the excess material at the end of the ruffle. My wig was going to cover it anyway. If it bothers you, I’m sure you can trim it, but be wary about the fabric fraying/unraveling if you cut it.
Step 12: Place the pom poms.
Put everything back on, including your correctly sized neck ruffle. Note where the ruffle ends. Note where your skirt begins. You can use a pin to mark those places, or a dressmakers pencil, or a regular pencil. I recommend pins, because of the aforementioned water stains.
Arrange the three orange pom poms on the shirt. If you don’t have a lot of room, you can probably use two pom poms, or even one. Just eyeball it at this point, being mindful of the fact that they will weigh down the “blousiness” of the shirt. With that in mind, take off the shirt and place pins or pencil marks where you want to attach the pom poms. You can eyeball it or measure so there’s equal distance between them.
Hand sew the pom poms onto the shirt along the center line. I have no advice about hand sewing, except that the pom poms are huge and they’ll hide almost anything.
Step 13: Cheat on the sleeves.
I did NOT want to mess with trying to take in those sleeves. Can I sew through that fabric without pulling it all to hell? Probably not! So I cheated a little. I used stretched out hair ties.
They go on after you’ve got the whole costume on. Slip them over the sleeves, and place them about halfway up your forearm. Then adjust the fabric so that it blouses over the hair tie, with most of the volume toward your shoulders. That way your hands are more free, and you have a cool effect on top.
I spent some serious time stretching out those hair ties to a comfortable stretchiness which wouldn’t cut off my circulation or annoy me. I’m sure you can find bigger hair elastics at the store, or get creative and use something else entirely that you can customize to fit your arms. If you’re about a size 12 or smaller, though, hair ties are probably the easiest thing.
You could be adventurous and take in the sleeves! You could create the same effect by sewing an elastic inside the sleeves at the desired spot (probably). I don’t know how to do any of that yet. You go, you genderbent Pennywise, you!
Or just use the hair ties.
Pictured: Boop. Er, I mean, sleeve detail.
Accessorize
I am not the kind of cosplayer to make a cute dress and then wear a half-bald wig with it, no matter what Tim Curry looks like. But I did want to bring some influence from my source material into the hair design, so I decided on a red wig and a white clip-in bang piece.
I bought a very Lolita-esque wig with pigtails, because I fell in love with it. The pigtails come on large hair clamps that really help the bang piece stay on. You can get them on Amazon! There are soooooo many wig choices though, and many completely different directions to take the styling.
The nose I wore was plastic, and came with an “official” Pennywise makeup kit. I don’t recommend a plastic nose. The condensation is uncomfortable and ruins the makeup on your upper lip. The edges kind of hurt, and it has a tendency to fall off whenever you try to smile. Good thing Pennywise isn’t really the “smiling” kind of clown. If I ever wear this again, I’m going to get a foam nose, or just settle for painting my nose red.
A note about contacts: I bought awesome creepy yellow ones. I couldn’t get them in. If you don’t wear contacts in your regular life, I don’t recommend trying to do them for a cosplay. It’s way harder than it looks.
A note about pointy teeth: I bought a set of sharp teeth that were supposed to mold to your upper teeth. This was a total disaster. Not only did they not work but even if they had, they were built for a man’s mouth. If I had worn them, my whole upper lip would have protruded like a primate’s, and that’s hilarious, not scary. Most (all?) affordable full-row teeth are too big for a female mouth. Don’t do it. If you’re dying to up the scare factor, maybe try using a set of fangs that go on your individual teeth (although I personally have had limited success with those).
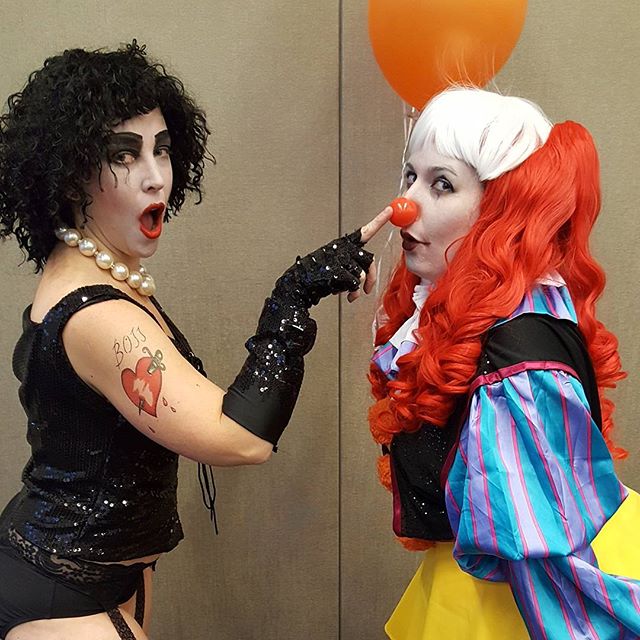
You’re done! You’re so cute! and …scary…?
Go yell “HIYA GEORGIE” at people. When they say “but my name’s Doug,” shout “YOU’LL FLOAT TOO!”
Wow, this post really got away from me. No one needs this tutorial. If you’re still reading– are you really going to make this, or are you just a glutton for punishment?! Tell me in the comments lol
